Collecting useful information about the Avada theme (for the WordPress engine). I have 17 copies of this theme and have been working with it since 2012. Thus, I have experience and share it for free.
One downside of Avada is that you cannot work with it in the Back-end Builder on a phone. Blocks do not open, cannot be moved or edited. Perhaps this is only an issue with Android, but it’s uncertain. So if you don’t have access to a computer, you won’t be able to work with Avada on your phone—you’re helpless like a child.
Another disadvantage of the Avada theme is its heaviness and sluggishness. Can this be fixed? Yes, by digging through dozens of minor settings, but that’s not an option for me.
One more downside—if you decide to switch from Avada to another theme, you’ll have to do a lot of work to restore the proper appearance of your content. This is because: a) Many elements, even plain text, will start with shortcodes like [fusion…], which will have to be manually removed. b) Codes embedded from other resources will remain encrypted as long strings like Iujspfjip03ijfrpm2o-)UI()i0pfjk039j4klJlkjdflg, which you’ll need to manually recover and reinsert.
This article collects reviews of the Avada theme for WordPress CMS and provides tips for configuring and developing a site with this theme.
This blog previously also ran on Avada, but then I opted for speed and simplicity. I changed the theme, disabled all unnecessary plugins, so the content below might not always display correctly as it was created using Fusion Builder and Fusion Core.
Theme settings descriptions are given in English, as their Russian translation is not always accurate or clear.
The official reseller of the WordPress theme Avada is Envato. As of July 1, 2022, the theme costs $69. You can purchase the licensed version of Avada here.
- Enable Comments on Pages in Avada
- Display Custom Fields in Avada
- How to Insert Code Snippets into Posts or Pages in Avada
- Change Link Hover Color
- Set Site Width in Percentages
- Remove Search from 404 Page in Avada
- Open Graph Markup
- Remove Dates from Recent Posts Widget in Avada
- Remove Dates and Comments in “Related Posts”
- Enable .SVG File Support
- Automatically Display the Current Year in the Footer
- Change Font Size in the Footer
- Display Banner Code in Header Content 3 on Mobile Devices
- How to Rename “Read More” in the Avada Theme
- How to Rename “Recent” and “Popular” in the “Tabs” Widget
- Avada Hotspots
- Example of Avada Hotspots in Action
- How to Disable Portfolio in the Avada Theme
- How to Change Post Type in Avada
- How to Configure User Roles in Avada
- How to Use Avada’s Pre-Built Templates
- Enable Maintenance Mode in Avada
- How to Add Custom Fonts in Avada
- How to Optimize Avada for Performance
- How to Add Schema Markup in Avada
- How to Add a Sticky Header in Avada
- How to Customize WooCommerce Product Pages in Avada
- How to Troubleshoot Common Issues in Avada
- How to Update the Avada Theme Safely
- How to Create a Multilingual Site with Avada
- How to Customize the Footer in Avada
- How to Use Dynamic Content in Avada
- How to Disable the Portfolio in the Avada Theme
- How to Change Post Type in Avada
- How to Configure User Roles in Avada
- How to Automatically Display the Current Year in the Footer
- How to Change Font Size in the Footer
- How to Display Banner Code in Header Content 3 on Mobile Devices
- How to Rename “Read More” in the Avada Theme
- How to Rename “Recent” and “Popular” in the “Tabs” Widget
- Avada Hotspots
- Example of Avada Hotspots in Action
- How to Disable Portfolio in Avada
- How to Change Post Type in Avada
- How to Set User Roles in Avada
Enable Comments on Pages in Avada
To enable commenting on pages, you need to activate this setting separately in the Avada theme. Navigate to Options, go to the Miscellaneous tab, select the Comments on Pages option with the note Turn on to allow comments on regular pages, and toggle it to ON.

Shortcut to the Options section for Avada theme settings: https://yourwebsite.com/wp-admin/themes.php?page=avada_options
Ensure that the ability to leave comments on pages is also enabled in WordPress admin settings. To do this, go to “All Pages,” select the page where you want to enable comments, click “Properties,” and check the “Allow Comments” box. This option is usually located next to “Template” and “Status.”
Tested on Avada V7.4.2
Display Custom Fields in Avada
How to display custom fields in Avada using the ACF (Advanced Custom Fields) plugin without knowing PHP or delving into code? Even a beginner can handle it—read this article https://webliner.pro/vyvod-proizvolnyh-poley-acf-wordpress-dlya-nachinayuschih/. This method will also ensure that the output of custom fields remains intact after updates to the CMS, theme, or plugin. Nothing will break.

How to Insert Code Snippets into Posts or Pages in Avada
To use PHP, HTML, CSS, and other code snippets as examples in an article, take advantage of a ready-made solution already provided in this theme.
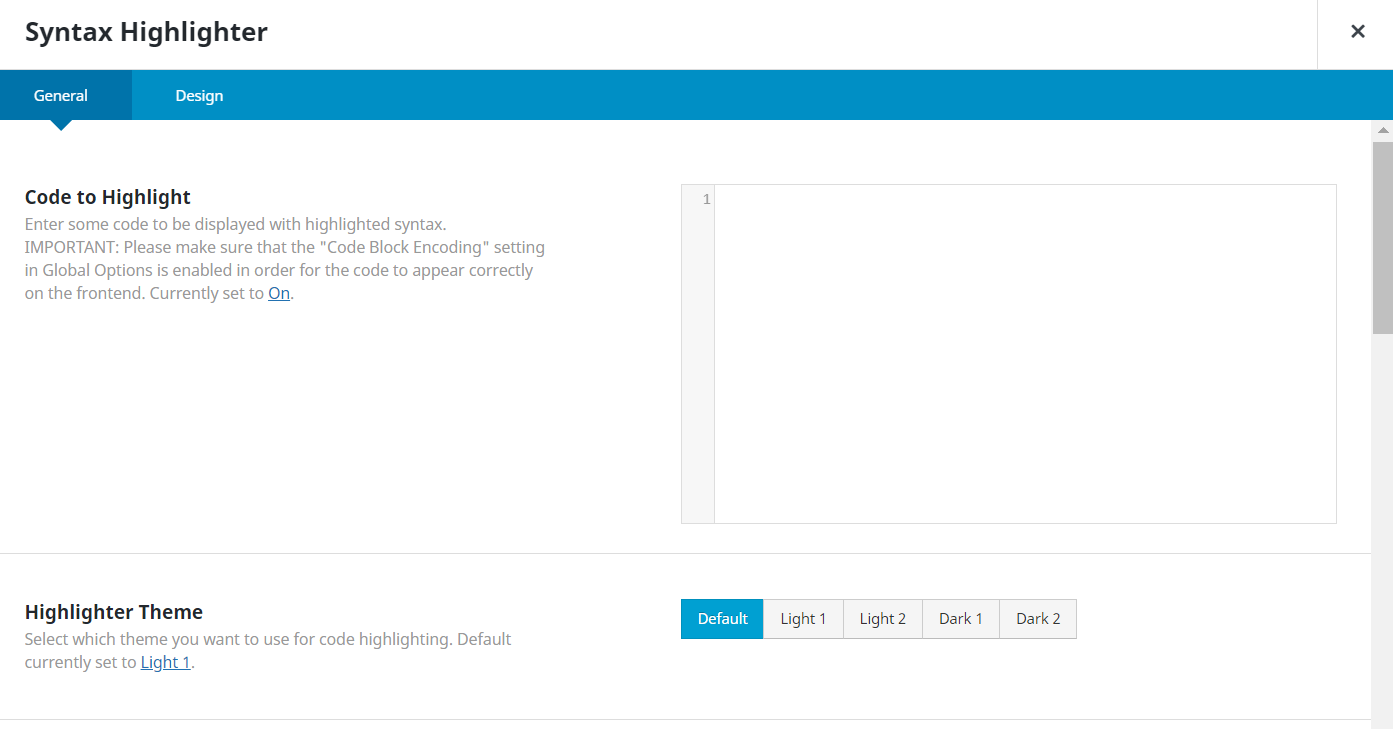
This element is called Syntax Highlighter, and it is specifically designed for adding code snippets to WordPress posts. The tool wraps the code, making it readable as plain text. The code will not execute.
Syntax Highlighter works in posts, pages, portfolios, product cards, and other areas of Avada. To use it, click the green “A” in the visual editor, navigate to the Design Elements tab, find Syntax Highlighter (in a Russian interface, it may be translated as “Подсветка синтаксиса”). The tool offers several formatting options and a “copy” button for convenient code handling.
Change Link Hover Color
You can set the link color in Avada by navigating to Avada > Options > Typography > Body Typography > Link Color.
But what if you need to change the color of links when hovered over with the mouse? Developers refer to this cursor state as hover or mouseover.
By default, this setting is not provided in the Avada theme, but you can still change the link hover color using Custom CSS. To do this, go to Avada > Options > Custom CSS and add the following code:
a {color: red;} /* link color */
a:visited {color:blue;}
a:hover {color:orange;}
a:active {background-color:tomato;}
The second line is responsible for the color of links you have already visited. You can remove it since this setting is rarely used nowadays. The third line is specifically for the hover color—insert your preferred color and save the changes.
The original solution in English is available here: https://forums.envato.com/t/how-do-i-change-link-color-attributes-in-avada/77104
These changes apply to text links in posts and pages without affecting styles for headers, footer items, etc.
Set Site Width in Percentages
There are two layout options for how a site can be displayed in Avada:
- Fixed;
- Responsive (fluid).
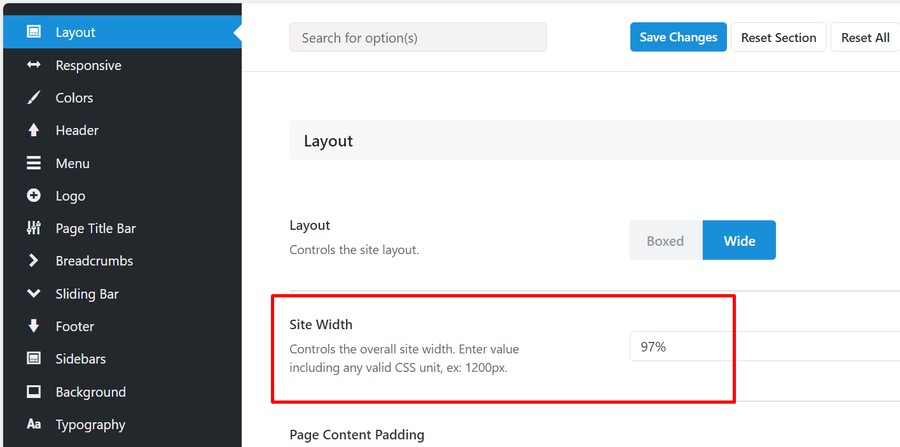
At first glance, you might not notice the availability of fluid layout because the description for the field where you set the site width mentions only pixels. This gives the impression that you can only set a fixed width.
Site Width
Controls the overall site width. Enter value including any valid CSS unit, ex: 1200px.
Translation:
Site Width
Controls the overall site width. Enter value including any valid CSS unit, for example: 1200px.
However, you can make the site fluid by specifying the width in percentages in the same field. To do this, enter the desired number followed by a percentage sign and save the changes. See the image below.
Purchase Avada from the official reseller
Remove Search from 404 Page in Avada
If you do not wish to use site search, make sure to remove the search field from the 404 page in the Avada theme, as this element is enabled by default. It cannot be disabled in the admin settings. To remove it, you need to delete the code from the theme files.
Go to wp-content > Themes > Avada and remove the following code from the 404.php file:
<div class="fusion-column col-lg-4 col-md-4 col-sm-4">
<h3><?php esc_html_e( 'Search Our Website', 'Avada' ); ?></h3>
<p><?php esc_html_e( 'Can\'t find what you need? Take a moment and do a search below:', 'Avada' ); ?></p>
<div class="search-page-search-form">
<?php echo get_search_form( false ); ?>
</div>
</div>
Why should you make changes in the child theme instead of the main theme? This is to ensure that these changes do not get overwritten during theme updates.
Open Graph Markup
The Avada theme includes the option to enable Open Graph markup. To do this, navigate to Theme Options > Advanced > Theme Features > Open Graph Meta Tags, toggle it to On, and save the changes.
Warning: Some optimization plugins, such as Yoast SEO, implement their own Open Graph functionality. If you wish to use these, you should disable the option in Avada.
Remove Dates from Recent Posts Widget in Avada
Avada includes a “Recent” widget that displays in various tabs:
- New posts;
- Most popular posts;
- User comments.
Any two of these can be disabled, leaving, for instance, only popular posts.
However, the developers did not include the ability to hide the publication date of posts. As noted by one user in reviews about Avada on another site, if still-relevant material was published years ago, the old publication date might mislead users. They may think the material is outdated.
To avoid this, go to Options -> Custom CSS, and add the following code to the field:
.fusion-tab-recent.fusion-tab-content.tab.tab_content .fusion-meta,
.fusion-tabs-widget .fusion-tabs-widget-content .post-holder .fusion-meta {
display: none;
}
Save the changes, and publication dates will disappear from the Recent widget.
Remove Dates and Comments in “Related Posts”
Avada includes a built-in tool for displaying related posts under a blog post or related projects in the “Portfolio” section. However, it has a feature that many find unnecessary—displaying the publication date and the number of comments for the posts or projects.
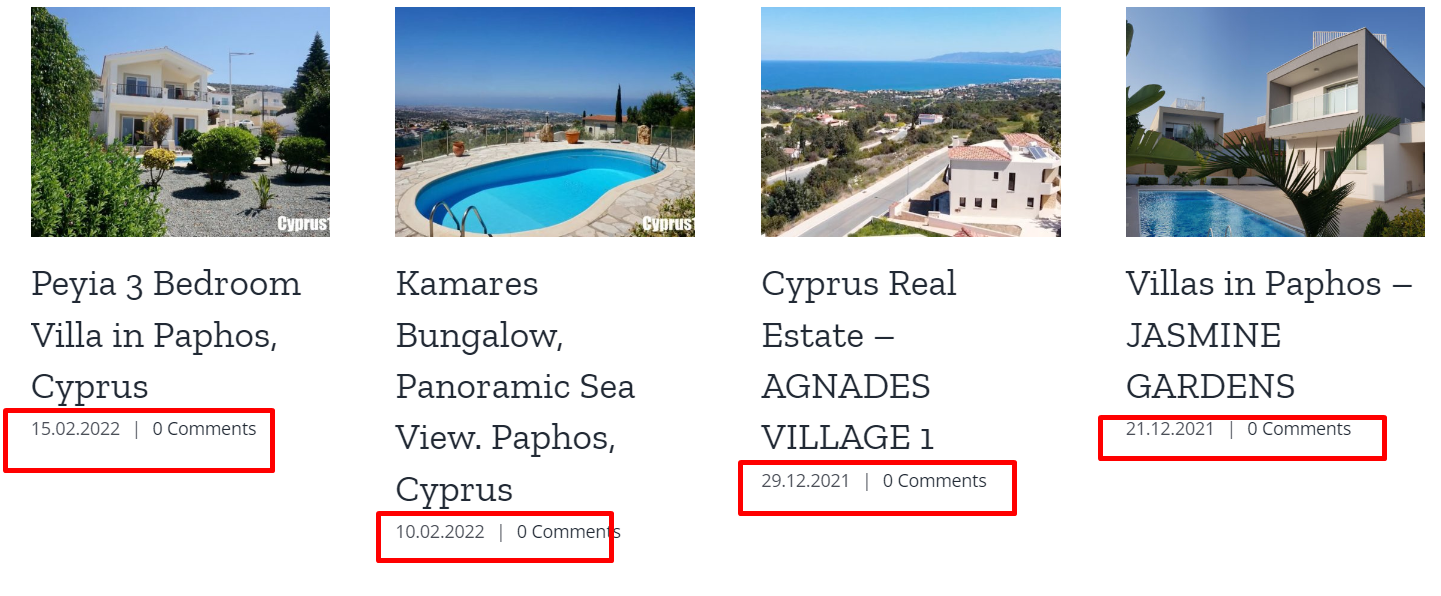
.fusion-carousel-title-below-image .fusion-carousel-meta {
display: none;
}
Enable .SVG File Support
Many Avada users dislike creating separate logo sizes for Retina (with an additional version for mobile phones). Moreover, even having logos of different sizes doesn’t always work correctly.
The solution in such cases is to use scalable vector graphics (.SVG) files instead of the usual .jpg or .png. See the Wikipedia page: https://en.wikipedia.org/wiki/SVG
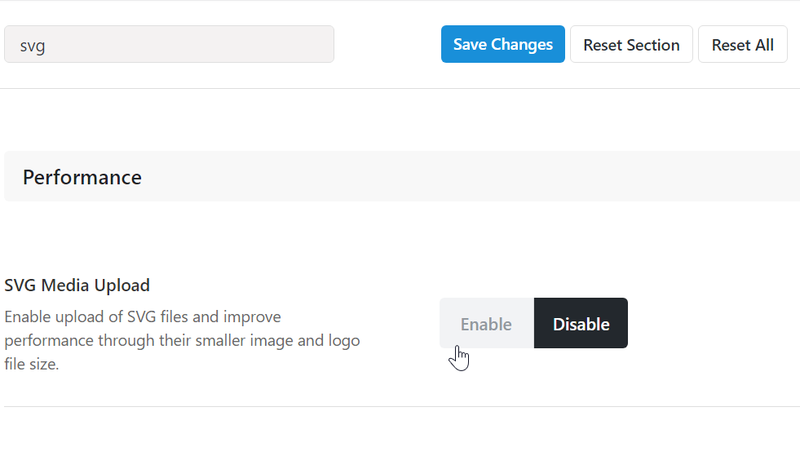
To enable SVG file support in Avada, go to the Performance section in the settings, enable the “SVG Media Upload” option, and save the changes. You can also find this setting using the search form by typing “svg” (see screenshot).
[wpremark preset_name=”default-warning” icon_show=”1″ icon_image=”warning-circle-regular” icon_width=”32″ icon_height=”32″ icon_indent=”16″ background_show=”1″ border_top=”0″ border_right=”0″ border_bottom=”0″ border_left=”0″ border_width=”2″ shadow_show=”0″ shadow_x=”0″ shadow_y=”5″ shadow_blur=”10″ shadow_stretching=”-5″ shadow_opacity=”0.3″ title_show=”0″ title_bold=”0″ title_italic=”0″ title_underline=”0″ title_uppercase=”0″ title_font_size=”18″ title_line_height=”1.5″ text_bold=”0″ text_italic=”0″ text_underline=”0″ text_uppercase=”0″ padding_top=”20″ padding_right=”20″ padding_bottom=”20″ padding_left=”20″ margin_top=”20″ margin_right=”0″ margin_bottom=”20″ margin_left=”0″ border_radius=”5″ block_id=”OoJz”]This feature for using .SVG is available in Avada version 7.7 and above.[/wpremark]
Automatically Display the Current Year in the Footer
There are several solutions for displaying the current date on your site. On the Avada support forum, users suggest the following standard code:
<script>document.write(new Date().getFullYear())</script>If you’re using the Avada theme, place this line of code in Theme Options > Footer Content > Copyright Text. After this, the current year will automatically appear in the footer of your site, eliminating the need for manual updates every year.
This code works not only with Avada but with other WordPress themes as well!
Change Font Size in the Footer
Avada provides settings to change the size of widget titles (Headings) in the footer, but it doesn’t have an easy way to change the size of the main font in footer widgets.
If you need to adjust the text size specifically in the footer, go to Avada > Options > Custom CSS and add the following code:
.fusion-footer-widget-area a {
font-size: 16px !important;
}
Replace “16px” with your desired size. Don’t forget to save the changes.
Display Banner Code in Header Content 3 on Mobile Devices
By default, Avada does not display banner code from Header 3 on phones if the header position is set to the left (Header Position – Left). Instead of appearing at the top, it is fixed as a left column. The banner code will be visible on desktops and laptops but not on mobile devices.
To display the banner code from the Header Content 3 field on phones, add the following code to the Custom CSS section:
@media only screen and (max-width: 800px) {
#side-header .fusion-main-menu, #side-header .side-header-content-1-2, #side-header .side-header-content-3 {
display: block !important;
}
}
How to Rename “Read More” in the Avada Theme
When displaying recent blog posts in a grid or other layout, you can choose to show or hide the “Read More” text. If enabled, this text appears as is, and translating it into another language may not seem straightforward. Here’s a solution from enthusiasts published on the Avada Theme-Fusion forum to rename “Read More” to “Читать далее” (or any text you prefer).
To do this, install the Avada Child theme, then go to Appearance – Theme Editor in the WordPress admin panel. Select the functions.php file of the Avada Child theme and add the following code:
// Called in Avada Blog Layout Template PHP File
add_filter( 'avada_blog_read_more_link', 'my_read_more_link' );
function my_read_more_link( $read_more ) {
$read_more = "Читать далее...";
return $read_more;
}
Save the changes. After this, “Read More” in the blog post grid will be renamed to “Читать далее” or any custom text you choose.
How to Rename “Recent” and “Popular” in the “Tabs” Widget
The easiest way to do this is by using the Loco Translate plugin, which allows you to edit WordPress localization files directly in your browser and integrates with automatic translation services.
Common mistakes users make when translating Avada templates and text elements:
- Translating the system file (ignoring the warning “Note: Changes to this file may be overwritten or deleted during WordPress updates”), which causes translations to disappear after Avada updates. This can be resolved by creating a new “Custom” directory.
- Searching for translation objects only in theme files, while they are often located in plugin files. For instance, to rename “Popular” and “Recent,” you need to search for these words in the Avada Core (Fusion Core) plugin files.
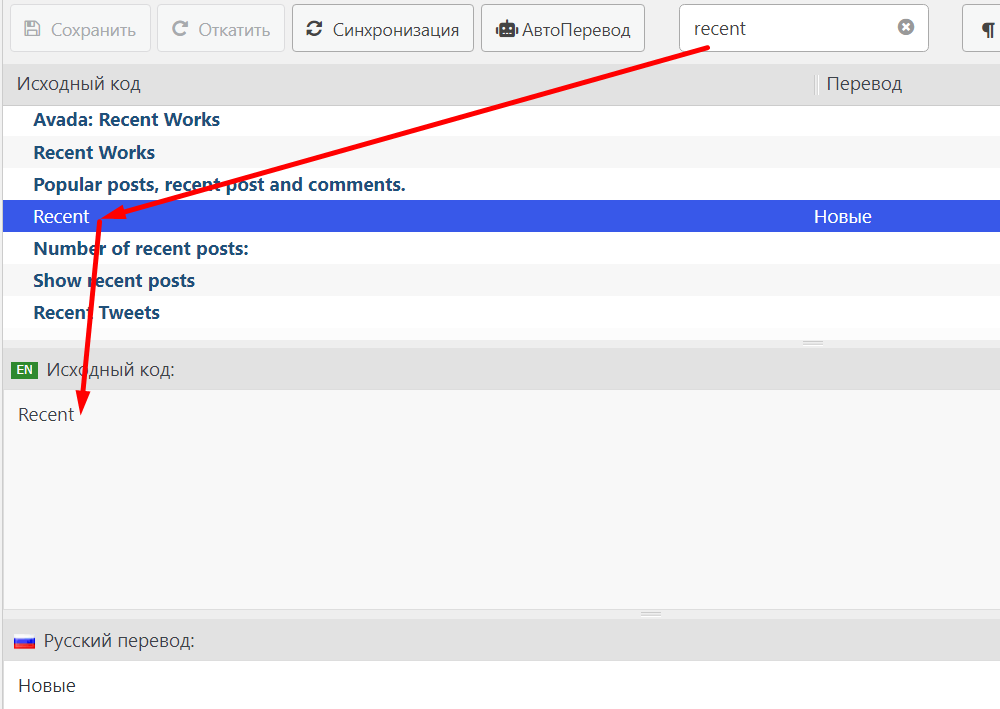
Go to Loco Translate – Plugins – Avada Core (Fusion Core), select your language, and click “Edit.” MAKE CHANGES IN THE CUSTOM DIRECTORY, NOT THE SYSTEM DIRECTORY. IF YOU DON’T HAVE A CUSTOM DIRECTORY YET, CREATE ONE BY CLICKING “NEW LANGUAGE.” This will prevent your custom translations from disappearing when the theme updates.
Once in the editor, search for “Recent” in the search bar and add your desired translation in the corresponding field, such as “Latest Posts” or “Новое.” Save the changes. Then, repeat the process for “Popular,” entering “Популярное” or “Frequent.” Save the changes.
Avada Hotspots
This theme includes a feature for placing interactive content on specific areas of an image. It is very useful for creating annotations, diagrams, and more.
[wpremark preset_name=”default-check” icon_show=”1″ icon_image=”check-circle-regular” icon_color=”#34bc58″ icon_width=”32″ icon_height=”32″ icon_indent=”16″ background_show=”1″ background_color=”#def9e5″ border_top=”0″ border_right=”0″ border_bottom=”0″ border_left=”0″ border_width=”2″ border_color=”#34bc58″ shadow_show=”0″ shadow_x=”0″ shadow_y=”5″ shadow_blur=”10″ shadow_stretching=”-5″ shadow_opacity=”0.3″ title_show=”0″ title_bold=”0″ title_italic=”0″ title_underline=”0″ title_uppercase=”0″ title_font_size=”18″ title_line_height=”1.5″ text_bold=”0″ text_italic=”0″ text_underline=”0″ text_uppercase=”0″ padding_top=”20″ padding_right=”20″ padding_bottom=”20″ padding_left=”20″ margin_top=”20″ margin_right=”0″ margin_bottom=”20″ margin_left=”0″ border_radius=”5″]Effective work with this element is only possible in Edit Live! mode.[/wpremark]
Because you need to move the cursor to a specific point on the image.
In the standard text editor or Avada Builder, this cannot be done; you can only manually set the coordinates of a specific point.
Example of Avada Hotspots in Action
See a live example on the developer’s site: https://avada.theme-fusion.com/element/image-hotspots/
You can purchase a licensed copy of the Avada theme on the official reseller’s website.
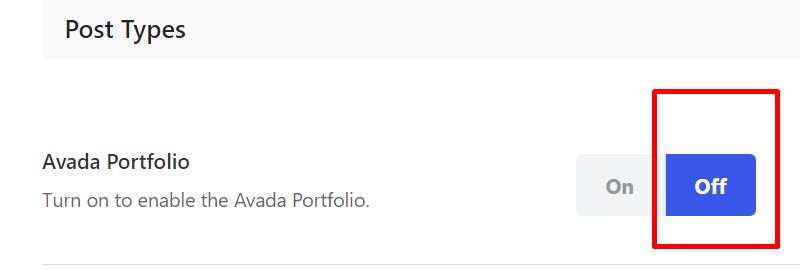
How to Disable Portfolio in the Avada Theme
Starting from version 7.9, Avada includes a built-in Maintenance and Coming Soon feature. The Maintenance mode allows you to display a placeholder such as “Site under maintenance/updates/reconstruction/service,” etc. The Coming Soon mode enables you to announce an upcoming event, such as a site launch, and even include a countdown timer. Suitable templates for this can be found in the Avada Library template in the site admin panel. To enable these modes, navigate to Avada Settings – Main Options – Maintenance Mode.
How to Change Post Type in Avada
What if you need to convert a post into a page, or vice versa? Avada also includes several post types, such as Portfolio or FAQ. Use this tested solution: https://webliner.pro/moya-sborka-wordpress/#posttypeswitcher. I needed to convert not only POSTS to PAGES but also FAQ to POST, and this plugin worked perfectly.
How to Configure User Roles in Avada
If you need to restrict roles for content creators, editors, multiple admins, etc., follow these steps:
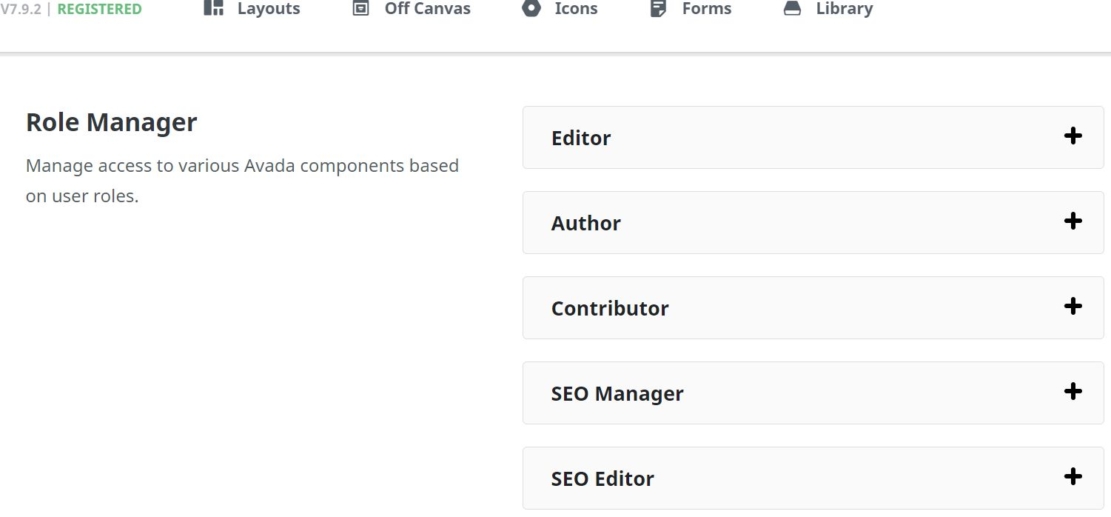
Go to your site’s admin panel at yourwebsite.com/wp-admin/admin.php?page=avada-builder-options, scroll to the bottom, and find the Role Manager section. Available roles include:
- Editor
- Author
- Contributor (can create drafts but cannot publish their own posts)
Depending on the plugins installed, additional roles may be available:
- SEO Manager
- SEO Editor
- Shop Manager
- And others
How to Use Avada’s Pre-Built Templates
Avada includes a library of pre-built templates that you can use to quickly set up pages and design elements. These templates are suitable for various purposes, such as blogs, portfolios, and online stores. To access the Avada template library:
- Go to the WordPress admin dashboard.
- Navigate to Avada > Library.
- Select a template category that matches your project (e.g., Blog, Portfolio, or Shop).
- Click on the desired template and import it into your site. You can choose to import the full template or specific sections like headers or footers.
These templates can be customized using Avada Builder, allowing you to adjust the colors, fonts, and layout to fit your branding needs.
Enable Maintenance Mode in Avada
Avada offers a built-in Maintenance Mode feature that allows you to show a “Site Under Maintenance” or “Coming Soon” message to visitors while you work on updates or prepare your site for launch. To enable Maintenance Mode:
- Go to the WordPress admin dashboard.
- Navigate to Avada > Main Options.
- Under Maintenance Mode, select either “Maintenance” or “Coming Soon.”
- Choose a template from the Avada Library to display during this mode.
- Save your changes.
Visitors will see the selected message or design while logged-in users with administrative access can continue to view and edit the site normally.
How to Add Custom Fonts in Avada
If you want to use custom fonts in your Avada theme, follow these steps:
- Navigate to Avada > Options > Typography.
- Scroll to the Custom Fonts section.
- Upload the font files (e.g., .woff, .ttf, or .otf).
- Assign the custom font to specific areas, such as headers, body text, or menus.
- Save your changes.
Avada supports Google Fonts, Adobe Fonts, and self-hosted font files. Ensure the font files are properly licensed for web use before uploading.
How to Optimize Avada for Performance
To enhance the performance and loading speed of your Avada-based website, consider these optimization tips:
- Enable Lazy Loading: Go to Avada > Options > Performance and enable lazy loading for images.
- Use Caching Plugins: Install a caching plugin like WP Rocket or W3 Total Cache to reduce load times.
- Minimize CSS and JavaScript: In Avada’s Performance settings, enable the options to minify and combine CSS and JS files.
- Optimize Images: Compress images using tools like TinyPNG or Smush before uploading them.
- Choose a Fast Hosting Provider: Opt for a hosting service that specializes in WordPress optimization.
Regularly test your site’s performance using tools like Google PageSpeed Insights or GTmetrix to identify areas for further improvement.
How to Add Schema Markup in Avada
Schema markup helps improve SEO by providing search engines with structured data about your website’s content. While Avada doesn’t include direct options for schema markup, you can implement it using custom code or plugins:
- Using a Plugin: Install a plugin like Schema & Structured Data for WP to automatically add schema to your pages and posts.
- Custom Code: Navigate to
Avada > Options > Custom CSS/JSand add schema markup in the header or footer using JSON-LD. For example:<script type="application/ld+json"> { "@context": "https://schema.org", "@type": "Organization", "name": "Your Business Name", "url": "https://yourwebsite.com", "logo": "https://yourwebsite.com/logo.png" } </script>
Remember to validate your schema markup using Google’s Rich Results Test.
How to Add a Sticky Header in Avada
Avada allows you to create sticky headers that remain visible as users scroll down the page. To enable and customize a sticky header:
- Go to
Avada > Options > Header > Sticky Header. - Enable the Sticky Header option.
- Customize settings such as background color, transparency, and height.
- Save changes and preview your site to see the sticky header in action.
This feature ensures that key navigation elements remain accessible throughout the user’s browsing experience.
How to Customize WooCommerce Product Pages in Avada
Avada integrates seamlessly with WooCommerce, allowing you to create custom layouts for product pages. Here’s how to customize WooCommerce product pages:
- Navigate to
Avada Builder > Templates > Add New Template. - Select Product as the template type.
- Use Avada Builder to add elements like images, product descriptions, pricing, and reviews.
- Save and assign the template to specific products or product categories.
This approach allows you to create unique layouts for your WooCommerce store while maintaining full control over the design.
How to Troubleshoot Common Issues in Avada
If you encounter issues while using Avada, follow these steps to troubleshoot:
- Clear Cache: Clear your browser and WordPress cache to ensure you’re viewing the latest changes.
- Disable Plugins: Temporarily deactivate plugins to check for compatibility issues.
- Check Server Requirements: Ensure your hosting server meets the minimum requirements for Avada, such as PHP version and memory limit.
- Inspect Console Errors: Use browser developer tools to identify JavaScript or CSS conflicts.
- Restore Defaults: If specific settings cause issues, reset them to default values via
Avada > Options > Reset.
For unresolved problems, consult the Avada Support Center.
How to Update the Avada Theme Safely
Keeping your Avada theme updated ensures that you benefit from new features, bug fixes, and compatibility improvements. Here’s how to update Avada safely:
- Backup Your Site: Use a plugin like UpdraftPlus to create a full backup of your website, including files and the database.
- Check Plugin Compatibility: Review the changelog on the Avada Theme page to identify any compatibility notes with plugins.
- Update the Theme: Go to
Avada > Updatesin the WordPress admin panel, and check for available updates. If you purchased Avada from ThemeForest, ensure your purchase code is entered underAvada > Registration. - Clear Cache: Clear your site and browser cache after the update to ensure all changes take effect properly.
- Test Your Site: Check all key functionalities and pages to ensure the update didn’t cause any issues.
If you encounter problems, you can restore your backup or contact Avada support for assistance.
How to Create a Multilingual Site with Avada
Avada supports multilingual websites when combined with plugins like WPML or Polylang. Here’s how to set it up:
- Install a Multilingual Plugin: Install and activate WPML or Polylang from the WordPress plugin directory.
- Configure Languages: Follow the plugin’s setup wizard to add the languages you want to support.
- Translate Pages and Posts: Use the plugin’s translation editor to create language-specific versions of your content.
- Translate Theme Strings: Go to
WPML > Theme and Plugins Localizationor use a plugin like Loco Translate to localize text within the Avada theme. - Set Up Language Switcher: Add a language switcher to your site’s menu or sidebar to allow visitors to toggle between languages.
With these steps, you can create a fully localized and multilingual website using Avada.
How to Customize the Footer in Avada
Avada offers extensive options for customizing the footer of your website. Here’s how to configure it:
- Go to
Avada > Options > Footer. - Footer Layout: Choose the number of columns and the overall layout for the footer.
- Footer Widgets: Add widgets to the footer by navigating to
Appearance > Widgetsand assigning them to footer widget areas. - Custom Content: Add custom text, social media icons, or links in the Footer Copyright Text field under
Avada > Options > Footer > Copyright Bar. - Styling: Use the Footer Styling options to customize background colors, text colors, and fonts.
These settings allow you to create a footer that complements your site’s overall design.
How to Use Dynamic Content in Avada
Dynamic content allows you to create templates and reuse them across multiple pages, saving time and ensuring consistency. To use dynamic content in Avada:
- Go to
Avada Builder > Templatesand create a new template. - Add placeholders for dynamic content like post titles, featured images, or author names using Avada’s Dynamic Content feature.
- Assign the template to specific post types, categories, or individual pages.
- Save the template, and it will automatically populate with relevant data wherever it’s used.
Dynamic content is particularly useful for blogs, portfolios, and WooCommerce stores, allowing you to streamline content updates and maintain a uniform design.
How to Disable the Portfolio in the Avada Theme

Starting from version 7.9, Avada includes a built-in Maintenance or Coming Soon feature. The Maintenance mode allows you to display a placeholder like “Site under maintenance/update/reconstruction/service,” etc. Coming Soon enables you to announce upcoming events, such as a site launch, and include a countdown timer. You can find a suitable template in the Avada Library template in the site’s admin panel. To enable these modes, go to Avada Settings – Main Options – Maintenance Mode.
How to Change Post Type in Avada
What if you need to convert a post into a page, or vice versa? Avada also includes several post types, such as PORTFOLIO or FAQ. Use this tested solution, personally verified: https://webliner.pro/moya-sborka-wordpress/#posttypeswitcher. I needed to convert not only POST to PAGE but also FAQ to POST, and this plugin worked perfectly.
How to Configure User Roles in Avada
If you need to restrict the roles of content creators, editors, multiple admins, etc., go to yourwebsite.com/wp-admin/admin.php?page=avada-builder-options, scroll to the bottom, and you’ll see the Role Manager. Available roles include:
- Editor;
- Author;
- Contributor (differs from Author in that they cannot publish their posts).
Depending on the installed plugins, additional roles may be available:
- SEO Manager;
- SEO Editor;
- Shop Manager;
- and others.

How to Automatically Display the Current Year in the Footer
There are several ways to display the current year on your website. On the Avada support forum, users suggest the following standard code:
<script>document.write(new Date().getFullYear())</script>If you are using the Avada theme, place this line of code in Theme Options > Footer Content > Copyright Text. After this, the current year will automatically appear in the footer of your site, eliminating the need to manually update it every year.
This code works not only with Avada but also with other WordPress themes!
How to Change Font Size in the Footer
Avada offers settings to change the size of widget titles (Headings) in the footer, but it does not provide an easy way to change the size of the main font in footer widgets.
If you need to adjust the text size in the footer, go to Avada > Options > Custom CSS and add the following code:
.fusion-footer-widget-area a {
font-size: 16px !important;
}
Replace “16px” with your desired size. Don’t forget to save the changes.
How to Display Banner Code in Header Content 3 on Mobile Devices
By default, Avada does not display banner code from Header 3 on mobile devices if the header position is set to the left (Header Position – Left). Instead of appearing at the top, it is fixed as a left column. The banner code will be visible on desktops and laptops but not on mobile devices.
To display the banner code from the Header Content 3 field on phones, add the following code to the Custom CSS section:
@media only screen and (max-width: 800px) {
#side-header .fusion-main-menu, #side-header .side-header-content-1-2, #side-header .side-header-content-3 {
display: block !important;
}
}
How to Rename “Read More” in the Avada Theme
When displaying recent blog posts in a grid or other design, you can choose to show or hide the “Read More” text. If enabled, this text appears as is, and translating it into another language may not seem straightforward. Here’s a solution from enthusiasts, published on the Avada Theme-Fusion forum, to rename “Read More” to “Читать далее” (or any text you prefer).
To do this, install the Avada Child theme, then go to Appearance - Theme Editor in the WordPress admin panel. Select the functions.php file of the Avada Child theme and add the following code:
// Called in Avada Blog Layout Template PHP File
add_filter( 'avada_blog_read_more_link', 'my_read_more_link' );
function my_read_more_link( $read_more ) {
$read_more = "Читать далее...";
return $read_more;
}
Save the changes. After this, “Read More” in the blog post grid will be renamed to “Читать далее” or any custom text you choose.
How to Rename “Recent” and “Popular” in the “Tabs” Widget
The easiest way to do this is by using the Loco Translate plugin, which allows you to edit WordPress localization files directly in your browser and integrates with automatic translation services.
Common mistakes users make when translating Avada templates and text elements:
- Translating the system file (ignoring the warning “Note: Changes to this file may be overwritten or deleted during WordPress updates”), which causes translations to disappear after Avada updates. This can be resolved by creating a new “Custom” directory.
- Searching for translation objects only in theme files, while they are often located in plugin files. For instance, to rename “Popular” and “Recent,” you need to search for these words in the Avada Core (Fusion Core) plugin files.
Go to Loco Translate - Plugins - Avada Core (Fusion Core), select your language, and click “Edit.” MAKE CHANGES IN THE CUSTOM DIRECTORY, NOT THE SYSTEM DIRECTORY. If you don’t have a Custom directory yet, create one by clicking “New Language.” This will prevent your custom translations from disappearing when the theme updates.
Once in the editor, search for “Recent” in the search bar and add your desired translation in the corresponding field, such as “Latest Posts” or “Новое.” Save the changes. Then, repeat the process for “Popular,” entering “Популярное” or “Frequent.” Save the changes.

Avada Hotspots
Avada includes a feature for placing interactive content on specific areas of an image. This is very useful for creating annotations, diagrams, and other interactive visual elements.
[wpremark preset_name=”default-check” icon_show=”1″ icon_image=”check-circle-regular” icon_color=”#34bc58″ icon_width=”32″ icon_height=”32″ icon_indent=”16″ background_show=”1″ background_color=”#def9e5″ border_top=”0″ border_right=”0″ border_bottom=”0″ border_left=”0″ border_width=”2″ border_color=”#34bc58″ shadow_show=”0″ shadow_x=”0″ shadow_y=”5″ shadow_blur=”10″ shadow_stretching=”-5″ shadow_opacity=”0.3″ title_show=”0″ title_bold=”0″ title_italic=”0″ title_underline=”0″ title_uppercase=”0″ title_font_size=”18″ title_line_height=”1.5″ text_bold=”0″ text_italic=”0″ text_underline=”0″ text_uppercase=”0″ padding_top=”20″ padding_right=”20″ padding_bottom=”20″ padding_left=”20″ margin_top=”20″ margin_right=”0″ margin_bottom=”20″ margin_left=”0″ border_radius=”5″]Effective work with this element is possible only in the Edit Live! mode.[/wpremark]
This is because you need to position the cursor on a specific point on the image.
In the standard text editor or in Avada Builder, this cannot be done; you can only manually set the coordinates of a specific point.
Example of Avada Hotspots in Action
You can see a live example on the developer’s site: https://avada.theme-fusion.com/element/image-hotspots/
You can purchase a licensed copy of the Avada theme on the official reseller’s website.
How to Disable Portfolio in Avada

Starting from version 7.9, Avada includes a built-in Maintenance or Coming Soon feature. With the Maintenance mode, you can display a placeholder like “Site under maintenance/update/reconstruction/service,” etc. The Coming Soon mode allows you to announce an upcoming event, such as a site launch, and include a countdown timer. You can find a suitable design template in the Avada Library template section in the admin panel. To enable these modes, go to Avada – Main Options – Maintenance Mode.
How to Change Post Type in Avada
What if you need to convert a post into a page or a page into a post? Avada also includes several post types, such as Portfolio or FAQ. Use this tested solution, personally verified: https://webliner.pro/moya-sborka-wordpress/#posttypeswitcher. I needed to convert not only POST to PAGE but also FAQ to POST, and this plugin worked perfectly.
How to Set User Roles in Avada
If you need to restrict the roles of content creators, editors, multiple admins, etc., go to yourwebsite.com/wp-admin/admin.php?page=avada-builder-options, scroll to the bottom, and you will see the Role Manager. Available roles include:
- Editor (can edit but not publish posts);
- Author (can write and publish their own posts);
- Contributor (can write drafts but cannot publish posts).
Depending on the installed plugins, additional roles may be available, such as:
- SEO Manager;
- SEO Editor;
- Shop Manager;
- and others.

These settings provide fine control over what each user can do on your site.
